ShopDreamUp AI ArtDreamUp
Deviation Actions


Suggested Deviants


Suggested Collections


You Might Like…


Description
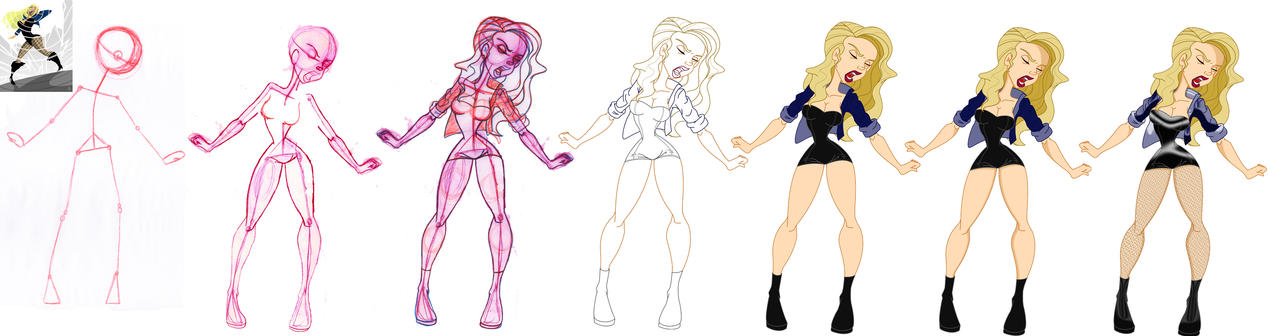
okay... here are most of my secrets in eight simple steps.
Step 1: chose your character, and how you best want to represent that character. for this example, I chose black canary (just to try someone new). Many thank to Mr-Representational for the sample picture, i did not follow his picture to the T because I wanted to represent in my own style.
Step 2: Always start with a Stick Figure. It help as a starting point, and you will build from there. Now for my picture, I want my Black Canary to be somewhat facing forward so I drew my stick figure as such.
Step 3: Start to add Shapes. I mostly only add circles, because we want our character to have jump out, and the best way to make a flat image pop out, is to make it break the plain with balls (In the animation profession this is Called Circle Theory) this gives character a soul.
Step 4: After you have the general idea of your character it is best to switch colors of your drawing pencil so you can add details, I chose blue to not get lost in a sea of red marks.
Step 5: After scanning in you final Sketch, You should ink it in the colors you wish to paint your character. Be careful this is where many beginning animators mess up, because You have an idea of COLOR THEORY to out line Your character. Color theory is the choosing of the outlining color. Depending on light and what color you chose for a certain section should be planed out.
Step 6: This is what is known as Undercolor. It is called Under color because your top layer will always be Your color theory line. You should always separate each color to it's own layer this help in later steps.
Step 7: If you separated the colors in thier own layer this step should be easy, just add a shadow layer right above each color and darken each color where you want shadow.
follow a simple light source ad have all your shadows in that direction. I chose my light source straight in front of the Character ( this is a bit advance because the shadows fall in many different directions)
Step 8: this is the highlight and texture step. what I do is draw out my texture design on a new file. i draw it flat in a small section and copy and paste it to enlarge the texture design. i do this about 30 to 40 times and then transfer the file to my Black canary. I use the warp tool in Adobe Photoshop to make it fit to my design. This adds depth to the picture.
There you have it. Sorry if this reads not to well, but like many artist i have dyslexia and find it hard to write with out going over 6 to 9 time.
Image size
2930x768px 988.44 KB
Comments5
Join the community to add your comment. Already a deviant? Log In
outstanding demo work. you rock!